
Dental Implant Procedure: A Step-by-Step Patient Guide
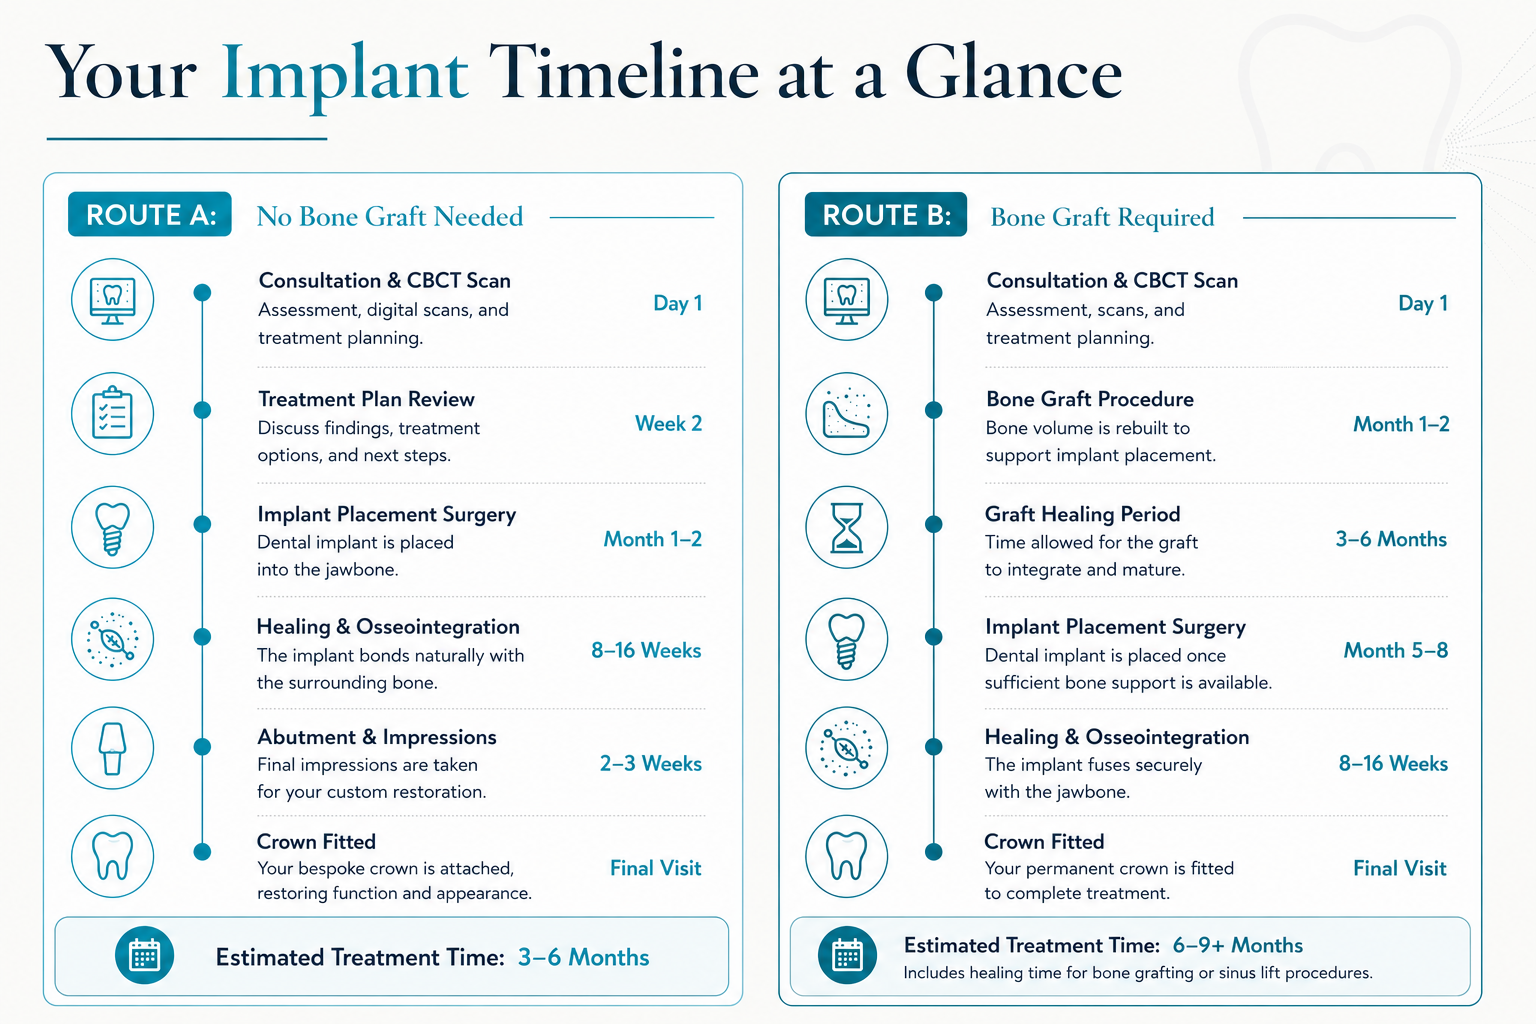
| TL;DR: The dental implant procedure steps run from initial consultation through to final crown fitting, typically taking 3–6 months without bone grafting or 6–9+ months if preparatory work is needed. Single implants in the UK generally cost from £1,500 to £3,000. Recovery after surgery is usually 1–2 days off work, with full healing taking 6–16 weeks. Treatment suits adults with healthy gums, adequate bone, and realistic expectations. At W Dental, every implant is placed by a GDC-registered dentist. |
If you’re researching the dental implant procedure steps, you’ve probably already weighed up dentures and bridges and decided you want something more permanent. Good. Implants are the only tooth-replacement option that replaces the root as well as the visible tooth, and that distinction matters for long-term bone health, bite stability, and daily comfort.
This guide walks you through every stage, from your first consultation to the moment your permanent crown is fitted, including honest timelines, what surgery actually feels like, and what happens if your jaw needs preparation work first.
What are dental implants and why does the process take time?
A dental implant is a small titanium screw placed directly into your jawbone. It acts as an artificial tooth root. Once the bone has fused around it, a custom crown is attached on top, giving you a tooth that looks, feels, and functions like a natural one.
The reason treatment takes months rather than weeks is biology. The bone must physically grow around the implant surface, a process called osseointegration. Rushing that stage significantly increases the risk of implant failure. According to the British Association of Oral and Maxillofacial Surgeons, the healing period after implant placement typically ranges from six to sixteen weeks, depending on bone quality, jaw location, and individual health factors.
The timeline also depends on whether preparatory procedures are needed. If you have been missing teeth for some time, the bone may have resorbed and require grafting before an implant can be placed. That adds months to the process. The full picture is covered below.
When are implants the right choice?
Implants suit adults who have lost one or more teeth, have healthy gums free from active periodontal disease, have sufficient jawbone density, are non-smokers or are willing to quit before treatment, and understand that the process requires patience and consistent aftercare. Certain medications, including bisphosphonates used for osteoporosis, and conditions such as uncontrolled diabetes, can affect healing and will be discussed at your consultation.
Implant types at a glance
Single-tooth implants replace one missing tooth. Implant-supported bridges replace several consecutive teeth without crowning healthy adjacent ones. Implant-retained dentures offer a stable full-arch solution. All-on-4 is a faster, same-day alternative for patients replacing a full arch.
The dental implant procedure steps explained
Here is what happens at each stage, in order.
Step 1: Initial consultation and assessment
Your first appointment covers your dental and medical history, a gum health check, digital X-rays, and, in most cases, a CBCT scan (cone beam computed tomography). CBCT provides a three-dimensional image of your jawbone, which tells the dentist exactly how much bone is available, where nerves are positioned, and at what angle the implant should be placed. It is far more informative than a standard two-dimensional X-ray and has become standard practice in reputable implant clinics.
By the end of this appointment, you should know whether you are a suitable candidate, whether any preparatory work is needed, a realistic cost range, and a treatment timeline. If a practice cannot give you this level of detail at the consultation stage, that is worth noting.
Step 2: Treatment planning
Based on the consultation findings, a written treatment plan is produced. This sets out implant positions, restoration type (single crown, bridge, or full arch), each stage of treatment with realistic timeframes, the full cost breakdown, and finance options if applicable. Prices are subject to consultation and may vary depending on complexity, but single-implant treatments at UK practices typically start from around £1,500–£3,000 per implant.
Step 3: Preparatory procedures (when needed)
Not every patient needs this stage, but many do, particularly those who have had missing teeth for a year or more.
Bone grafting: When the jawbone has resorbed, a graft rebuilds the height or width needed to support an implant. Material options include autograft (bone taken from elsewhere in your mouth or body), allograft (processed donor bone), and synthetic substitutes. Soft tissue heals within two weeks, but the graft itself takes three to six months to fully integrate before implant placement can begin. This is the most common reason treatment extends beyond six months.
Sinus lift: Required when placing implants in the upper back jaw, where the sinus cavity sits close to the bone. A sinus lift adds bone material beneath the sinus membrane to create enough depth for the implant. Healing takes approximately three to four months.
Extractions: If a failing or damaged tooth is still present, it must be removed before or at the time of implant placement. Some practices extract and place the implant in the same session; others prefer to allow the socket to heal first. Your dentist will advise which approach suits your anatomy.
Step 4: Surgical implant placement
This is the main procedure. It is performed under local anaesthetic, so you will feel pressure but not pain. Sedation is available for anxious patients.
The dentist makes a small incision in the gum to expose the jawbone, then uses a sequence of progressively larger drills to create a precisely sized socket. Throughout drilling, the site is flushed with sterile saline to prevent heat damage to the bone. The implant screw is then carefully threaded into position and tightened to the correct torque. Depth and angulation are critical: a misaligned implant creates bite problems and places uneven stress on the crown.
A healing cap is placed on top of the implant to protect it and begin shaping the surrounding gum tissue. Some practices fit a temporary tooth immediately for aesthetic reasons; others leave the site to heal undisturbed, which is the more conservative approach.
What to expect after surgery:
- Swelling peaks around days two to three and largely resolves by day seven
- Some bruising is normal
- Pain is manageable with ibuprofen or paracetamol in most cases
- Soft diet for the first week; avoid chewing on the implant side for six or more weeks
- Dissolvable stitches fall out within one to two weeks
- Most patients take one to two days off work; physically demanding roles may need longer
- Avoid smoking and alcohol throughout healing
If you experience persistent pain beyond the first week, unusual swelling, fever, or discharge, contact your dentist promptly.
Step 5: Healing and osseointegration (six to sixteen weeks)
Osseointegration is the biological process by which bone cells grow into the micro-textured surface of the implant, anchoring it permanently in place. The lower jaw, which has denser bone, generally heals in eight to twelve weeks. The upper jaw typically takes twelve to sixteen weeks.
Smoking substantially slows osseointegration and roughly doubles the risk of implant failure. Current smokers should be advised of this clearly before treatment begins.
Your role during this phase is straightforward: keep the area clean, take any prescribed antibiotics, eat sensibly, attend follow-up appointments, and leave the implant alone. The dentist monitors healing with low-dose X-rays to confirm bone integration before proceeding.
Step 6: Abutment placement and impressions
Once osseointegration is confirmed, the healing cap is removed, and the abutment (a small connector post) is attached to the top of the implant. This is what the crown will be secured to.
Abutment materials include titanium, which is strong and widely used, and zirconia, which is white and better suited to highly visible areas of the smile. Custom abutments are preferable to standard ones because they account for the specific angle and position of your implant.
Sometimes gum tissue grows over the implant site during healing. The dentist may perform a brief, minor procedure to re-expose it and shape the gum to the correct contour before attaching the abutment.
Once the gum has settled, typically within one to two weeks, digital impressions (or traditional putty moulds) are taken and sent to a dental laboratory. A technician fabricates your permanent crown to match the colour, shape, and size of your natural teeth. Lab fabrication takes approximately two to three weeks. A temporary crown is usually worn during this period.
Step 7: Final crown fitting and bite adjustment
When your permanent crown returns from the lab, it is secured onto the abutment, either cemented or screw-retained. Cemented crowns look slightly more natural because there is no visible access hole. Screw-retained crowns are easier to remove should maintenance be needed later.
The dentist checks the appearance, verifies the bite is balanced across your teeth, and confirms the crown is fully stable. A crown seated too high causes accelerated wear and can place excess load on the implant. Speak up if anything feels off; small adjustments take minutes and prevent months of discomfort.

Long-term aftercare and implant maintenance
Implants do not decay, but the gum and bone around them are still vulnerable to infection. Peri-implantitis, an inflammatory condition similar to gum disease, is the leading cause of late implant failure and is almost entirely preventable with good hygiene.
Daily care: brush twice daily with a soft-bristled toothbrush and non-abrasive toothpaste, and clean around the implant crown with interdental brushes or a water flosser. Standard floss can catch on the crown margin; implant-specific or shred-resistant floss is better suited.
Professional care: attend a dentist and hygienist appointment every six months. Your dentist will check crown wear, gum health, and implant stability, with a low-dose X-ray every two to three years to monitor bone levels.
Habits to avoid: smoking accelerates gum tissue breakdown around implants; biting ice or hard sweets risks chipping the crown; grinding (bruxism) should be managed with a nightguard.
With appropriate care, implant screws commonly last twenty-five years or more. The crown on top may need replacing after ten to fifteen years, but the implant itself should endure.
Conclusion
The dental implant procedure steps are not complicated, but they do require time, planning, and a dentist you can trust with the timeline and what each stage involves. From the initial consultation to final crown fitting, the process is methodical because it needs to be. Bone integration cannot be rushed, and every stage builds on the one before.
At W Dental, our GDC-registered dentists offer transparent treatment planning, realistic timelines, and aftercare guidance designed to protect your investment for the long term. If you are considering implants and want to understand what the process looks like for your specific situation, book a consultation and we will give you a clear picture before you commit to anything.
Results may vary. A consultation with your dentist is recommended before any treatment.
FAQs
How long does the dental implant procedure take from start to finish?
For a straightforward single implant with no preparatory work, treatment typically takes three to six months. If bone grafting or a sinus lift is required, the timeline extends to six to nine months or longer. Your dentist will give you a specific estimate based on your CBCT scan and treatment plan.
Is the dental implant procedure painful?
The surgery itself is performed under local anaesthetic, so you should feel pressure but not sharp pain. Post-operative discomfort is usually managed with over-the-counter painkillers such as ibuprofen or paracetamol and settles within five to seven days for most patients.
What are the dental implant procedure steps if I need bone grafting first?
If bone grafting is needed, the procedure steps expand to include the graft surgery, a three-to-six-month healing period, and then the standard implant placement sequence. The overall process is longer but the outcome is the same: a stable, permanent tooth replacement.
Can I have implants if I smoke?
Smoking significantly increases the risk of osseointegration failure and peri-implantitis. Many GDC-registered clinicians will advise patients to stop smoking at least eight to twelve weeks before surgery and throughout healing. Your dentist will discuss this openly at the consultation.
What happens if my implant fails?
Implant failure is uncommon when placed by a qualified clinician in a suitable patient. Signs include persistent pain, mobility, or infection. If failure occurs, the implant is removed, the site is allowed to heal, and re-implantation may be possible once the underlying cause has been addressed.